# Common settings
The work module WebVisitor Settings is used to define attendance rules.
Common settings - definition of general attendance rules that apply to everyone, see. link.
Note
Defining payroll exports, instant presence visibility, etc.
Group settings - defining attendance rules for different groups of settings, see. link.
Note
Specifying different work modes that are assigned to different work groups. In group settings, it is possible to define special attendance rules up to the level of one employee.
Privileges - defining authorizations and accesses for the attendance system, see. link.
Note
What actions in attendance can the editor perform and which centers can he see.
# Common attendance settings
In the basic common settings screen, there are buttons in the upper left corner:

Changelog - contains a description of all versions of the webVistor application
Email test - serves to test e-mail communication from webVisitor
# Parameters
# Current attendance period

-shows the current attendance period/current month
# Level of month closure lock
- value from 1 to 100

The number of the monthly closure represents how much weight the closure of the complete monthly attendance has. Only an authority with a higher number can unlock the monthly closure again.
Example
The manager with the "Editor" authorization has a lock value of 9, and the wage earner with the "Admin" authorization has the lock value of 20. The manager cannot unlock the monthly closure, the wage earner has this authorization. Values are defined see. link
# Ignored breaks

In the system, it is possible to define an break on the reader, which should be monitored as part of crossings through doors or turnstiles, but it is not necessary to monitor it during attendance. We select this break from the list of breaks, by clicking we select a break from the list of breaks.
Order of break correction and rounding
break correction - automatic adjustment of the length of the break according to the set rules, in the sense of adjusting the precisely determined length of the break in minutes
break rounding - automatic adjustment of the break according to the set rules in terms of the set rounding. see. link

-number 1- the Break Correction is done first
- number 2- after the correction, Break Rounding takes place
Note
Changing the numbers will change the order of the auto-edit.
# Employees attendance
Defines the basic views in the report Employees attendance.
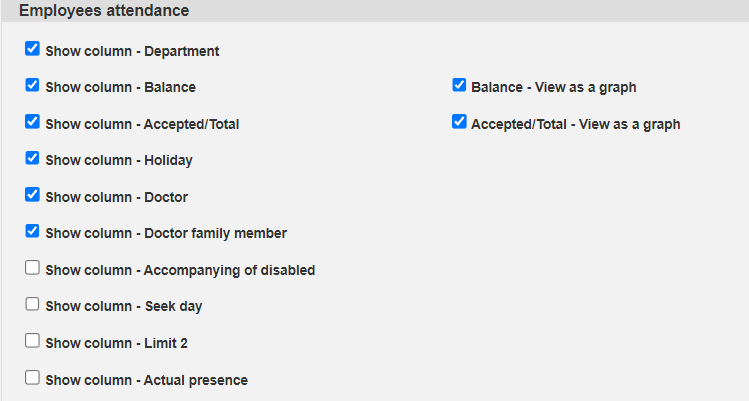
Click to select what should be displayed in the Employees Attendance record.
Example
Enabled parameters are displayed in employees attendance:
# Monthly attendance
Defines the basic views in the monthly attendance report for all employees:
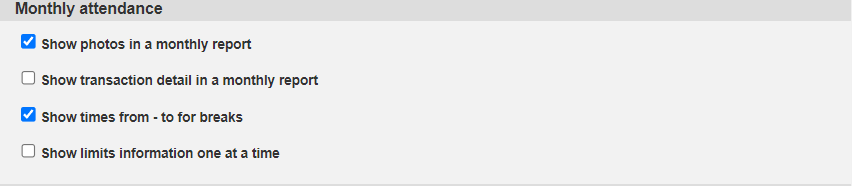
Show photos in the monthly report - if the photo function is set on the attendance reader, by placing the mouse on the transaction it is possible to display the photo of the employee, which was created during the registration of the transaction.

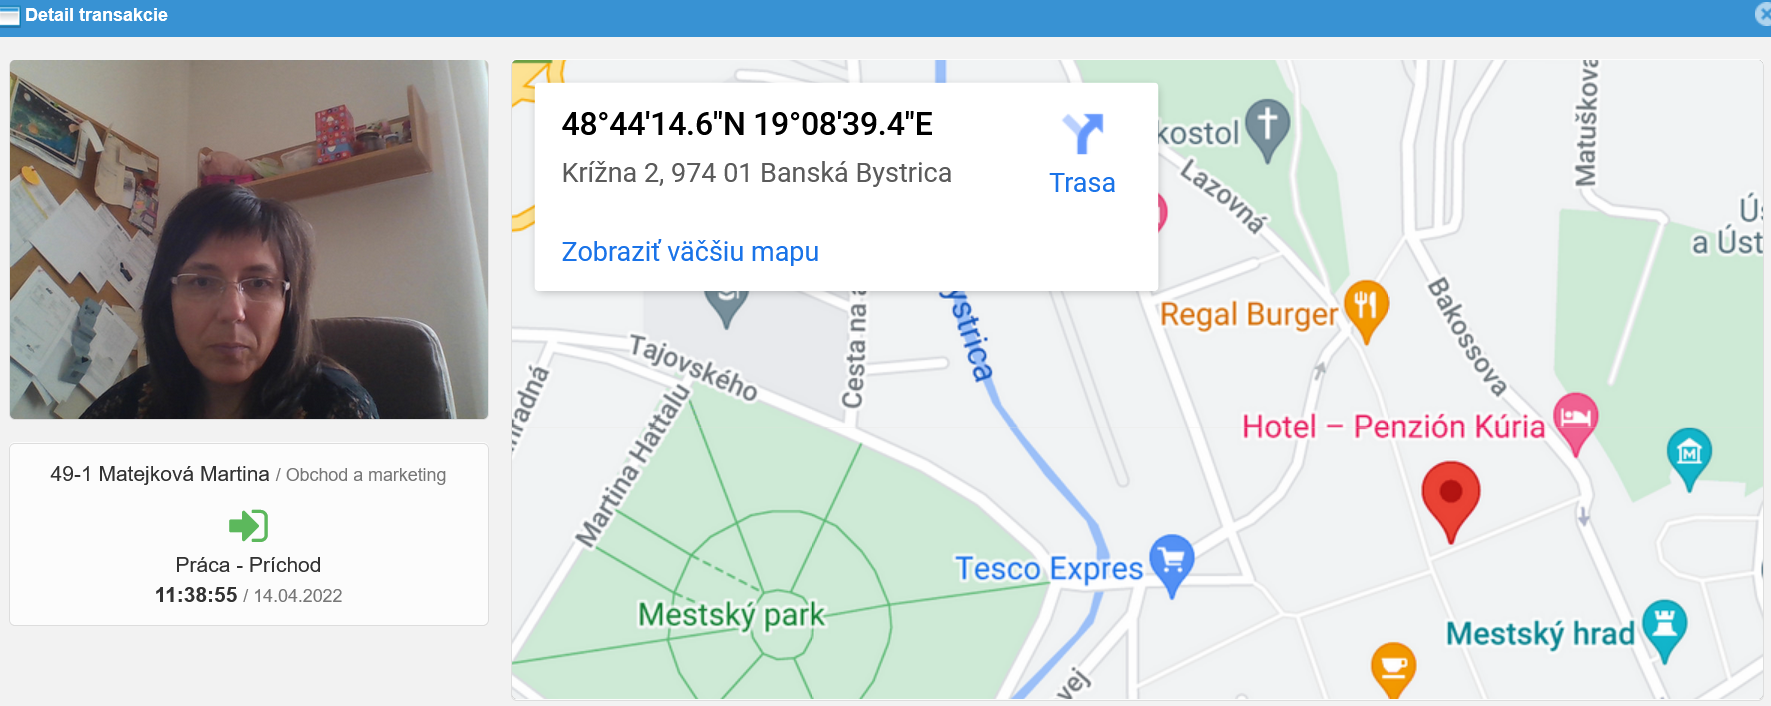
Show transaction detail in a monthly report - if GPS location scanning is enabled, double-click on the day to display the nearest GPS point according to the mobile operator where the transaction was made.
Show times from - to for breaks- in the employee's attendance report, the break summary and the break time from-to are displayed.

# Error
The error line will turn red if the option consider an empty day as an error or consider a break outside the arrival - departure interval as an error is selected. An empty day is considered an error only if work is scheduled on the day (a work interval is assigned to the day):

# Approving - Monthly attendance
It is set for the activated module - Electronic approval of monthly attendance. The module is used for electronic signing of monthly attendance and the possibility of archiving in pdf format.
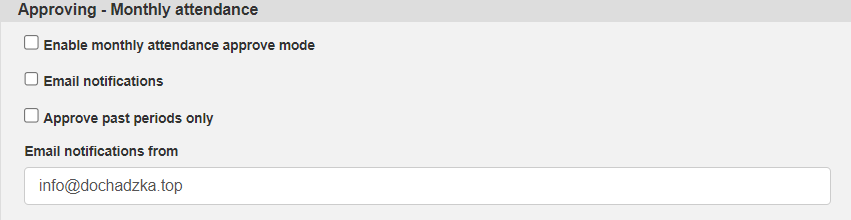
Enable monthly attendance approve mode -if the module is activated, the option must also be marked as active.
Email notifications - if the option is checked, after the employee's attendance is approved, a notification will be sent by e-mail to the manager that the employee has approved (electronically signed) the attendance. After the supervisor approves the attendance, a similar e-mail notification will be sent to the employee.
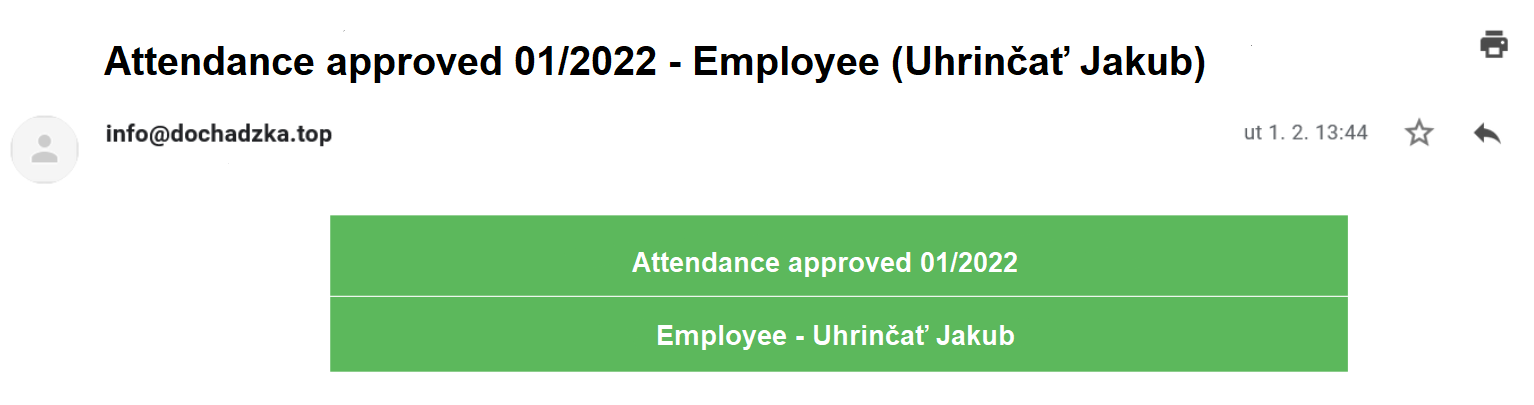
Approve past periods only - only a complete month can be approved in the system. It is not possible to approve attendance within a month.
# Approving - Breaks
It is set for the activated module - Electronic break approval. The module is used for approving breaks(e.g. vacation) through an electronic request in webVistor and subsequent approval by the manager through e-mail or directly in the webVistor application.
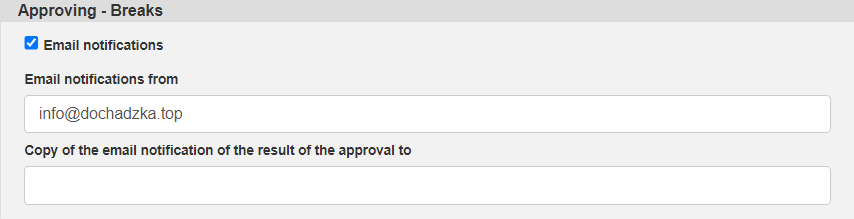
Email notifications - the option must be marked as active if the approval of breaks is to take place using e-mail communication.
Email notifications from - entering the name of the e-mail from which requests and notifications of the break approval process will be sent.
Copy of the email notification of the result of the approval to - entering additional e-mail addresses to which approved breaks should be sent.
Note
An email approving the break by the manager will be sent to the employee's email address. Another address can be, for example, the address of the wage earner, who can electronically archive the e-mail notification as a signed vacation ticket.
# Actual presence
The work module Actual presence is used to display the immediate presence of employees at work.
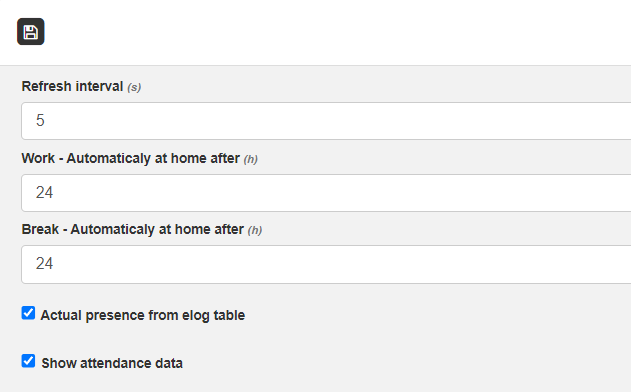
Refresh interval - time in seconds after which the actual presence display is refreshed.
Work - Automaticaly at home after - time in hours after the last transaction (arrival), after which the employee should be marked as absent in the actual presence.
Note
If the employee does not end the day by leaving work and does not make any other transaction by the specified time, the system automatically marks the employee as absent from work after the set time (e.g. 24 hours).
Break - Automaticaly at home after - time in hours after the last transaction (leave for break), after which the employee should be marked as absent in the actual presence.
Note
If the employee does not end the day by arriving from the break and does not make any other transaction by the specified time, the system will automatically mark the employee as absent from work after the set time (e.g. 24 hours).
Actual presence from elog table - the choice defines the way of displaying the actual presence. If it is active in the actual presence, only transactions from readers are displayed. Transactions completed manually, presented through webReader or generated by the approval process in webVistor are not displayed.
Show attendance data - view transactions from the webVisitor application. Both manually entered transactions (arrival, departure, break, including approved breaks) and transactions entered through webReader will be displayed.
Graph - specifying the level to which the departures should be displayed in the actual presence graph.
Grid - display used as an actual presence monitor:
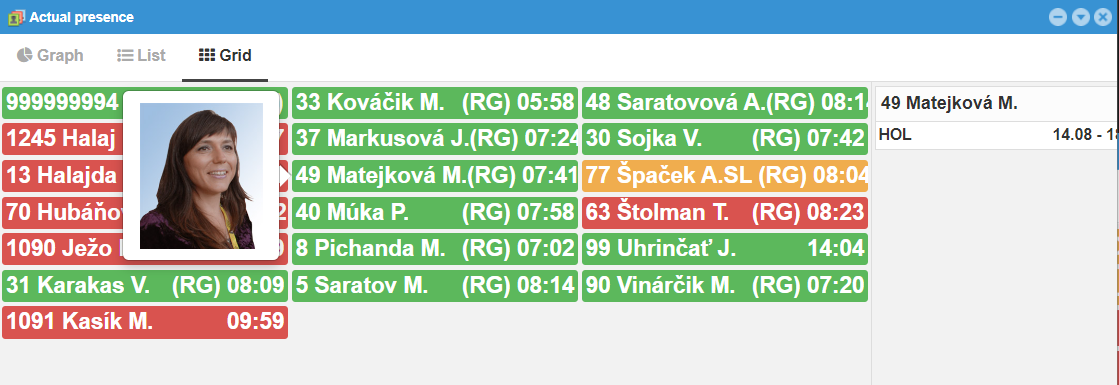
View without logging in - the web address where the actual presence monitor will be displayed even without logging into the webVisitor application.
Show personal number - displays the personal number of the employee
Abbreviated name - displays the name in the form of the full lastname and the first letter of the first name (e.g. Smith J.)
Show time - will display the arrival time or departure.
Show break name - if the employee is on break, the abbreviation of the break is displayed.
Show photo - after placing the mouse on the given employee, a photo will be displayed
Sort vertically - employees are listed vertically alphabetically
Number of columns - entering the number of display columns
Font size - defining the font size in the display
Colors - defining colors by clicking on the color scale:
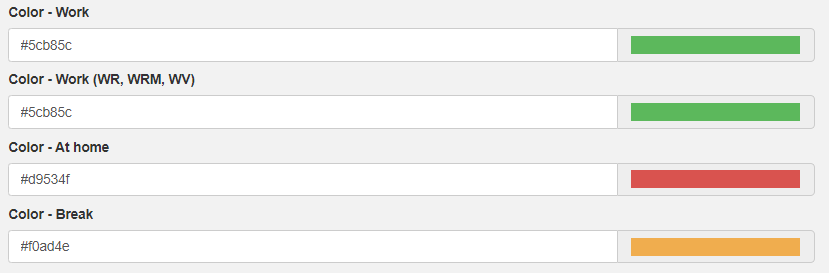
Color - Work - define the color for the employee at work who presented himself on the reader
Color - Work (WR, WRM, WV) - define the color for the employee who presented himself at:
      1. WR- webReader through PC
      2. WRM- webReadermobile through mobile application
      3. WV- by entering the transaction manually in the webVisitor application
Color - Home - define the color for absence from work
Color - Break - define the color when the employee is on break
Show planned breaks - display of planned breaks that are entered in the employee's attendance (e.g. vacation).
Shift presence - display of actual presence at individual shifts, including information about who should have been on shift and is not and who should not have been on shift and is.
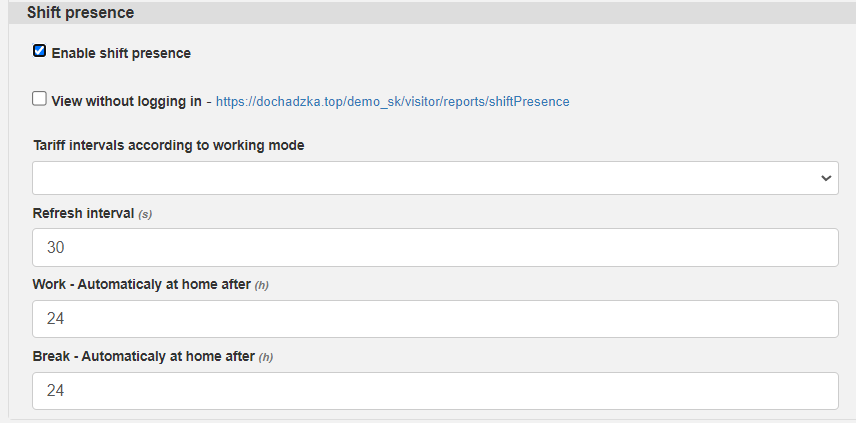
Enable shift presence - enabling display of shift presence
View without logging in - link for displaying shift presence without the need to log in to the webVisitor application.
Tariff intervals according to working mode - if a tariff interval is assigned to the work mode, it can be displayed in the shift actual presence:

Note
The tariff interval determines from when to when work shifts last and who is and should not be on a given work shift and who is not and should be.
Refresh interval - time in seconds after which the actual presence display is refreshed.
Work - Automaticaly at home after - time in hours after the last transaction (arrival), after which the employee should be marked as absent in the actual presence.
Note
If the employee does not end the day by leaving work and does not make any other transaction by the specified time, the system automatically marks the employee as absent from work after the set time (e.g. 24 hours).
Break - Automaticaly at home after - time in hours after the last transaction (leave for break), after which the employee should be marked as absent in the actual presence.
Note
If the employee does not end the day by arriving from the break and does not make any other transaction by the specified time, the system will automatically mark the employee as absent from work after the set time (e.g. 24 hours).
# Attendance output
The settings for Attendance output contain the basic parameters for the basic print reports of the attendance system. First choose the print report and then define the basic display parameters:
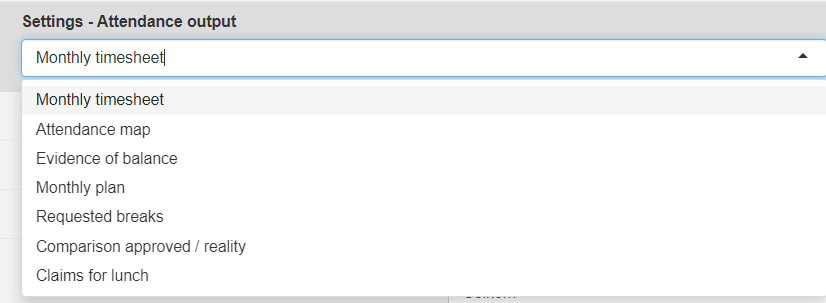
# Monthly timesheet
A printout that shows the employee's detailed monthly attendance and at the same time represents the basic basis for calculating the employee's salary.
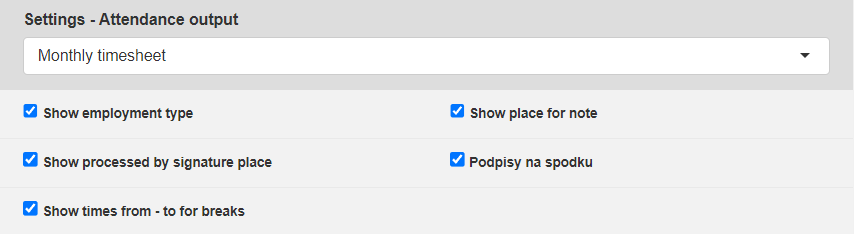
Show note - will display a note in the monthly timesheet
Show time flag - the monthly timesheet will show flags of whether the time was adjusted or supplemented by manual intervention, or supplemented automatically.
Summaries in the decimal system - attendance summaries can be displayed in hexadecimal or decimal. If this parameter is not selected, the totals are displayed in hexadecimal.
Note
The given parameters apply to all print reports in which you can show a note, show a time flag, or show summaries in the decimal system.
Show employment type - the employee's employment type assigned according to the code of employment type will be displayed.
Show place for note - in the report, it will show a place for adding a note if necessary.
Show processed by signature place - displays the space for the attendance processor's signature.
Show times from - to for breaks - in the place of the statement, where the duration of the brek and the note are displayed, the duration of the breakfrom-to will also be indicated.
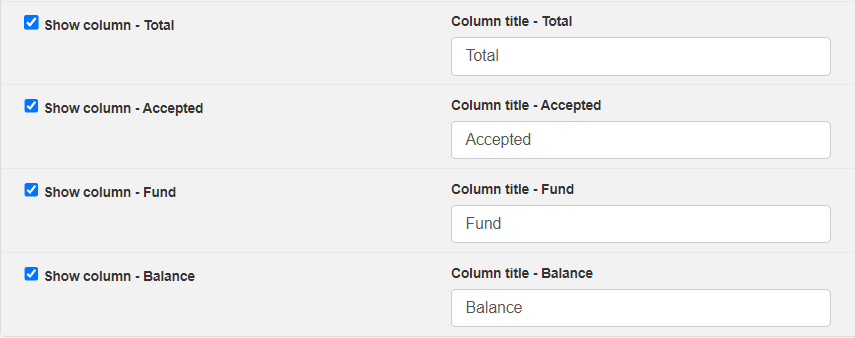
Show column - Total - will display a column that summarizes the total number of hours worked. This column can be renamed to "Column Title- Total".
Show column - Accepted - will display a column that summarizes the total number of recognized hours worked. This column can be renamed in "Column Title- Accepted".
Show column - Fund - will display a column that summarizes the prescribed working time fund. This column can be renamed in "Column Title- Fund".
Show column - Balance - displays a column that summarizes the total number of plus and minus hours with respect to the prescribed working time fund. This column can be renamed in "Column Title- Balance".
# Attendance map

Abbreviated name - in the attendance map, the abbreviated name will be displayed in the form Lastname, first letter of the name (e.g. Smith J.)
# Evidence of balance
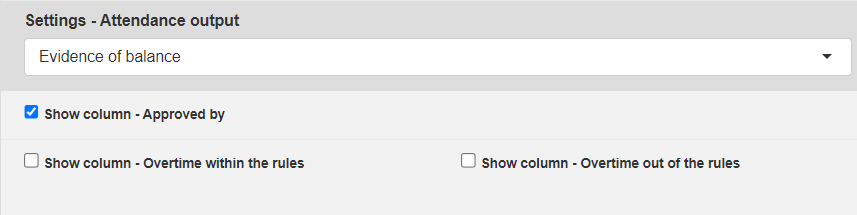
Abbreviated name - in the evidence of balance, the abbreviated name will be displayed in the form Lastname, first letter of the name (e.g. Smith J.).
Show column - Approved by - will display a column in which the name of the approver will be listed.
Show column - Overtime within the rules - will display overtime that complies with the set rules.
Show column - Overtime within the rules - will display overtime that does not comply with the set rules.
# Monthly plan

Show colors - the print report will display the colors according to the color settings in the working intervals.
# Requested breaks

Title - it is possible to enter the title of the print report
# Comparision approved / reality
A print record that compares the approved break time to the actual break time.

Breaks - select the breaks that the print report will display.
Note
Comparison of the time for the approved break "doctor" and the original time actually spent with the doctor.
# Claims for lunch
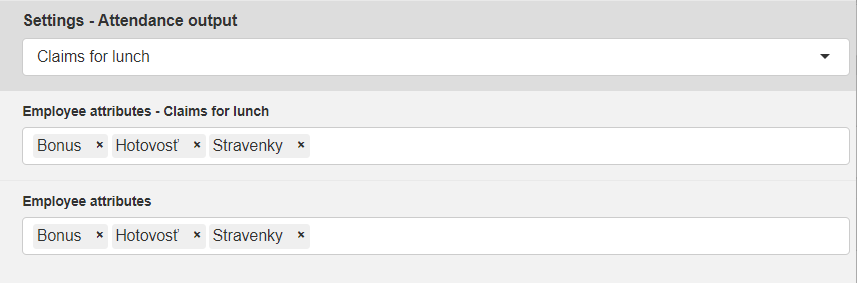
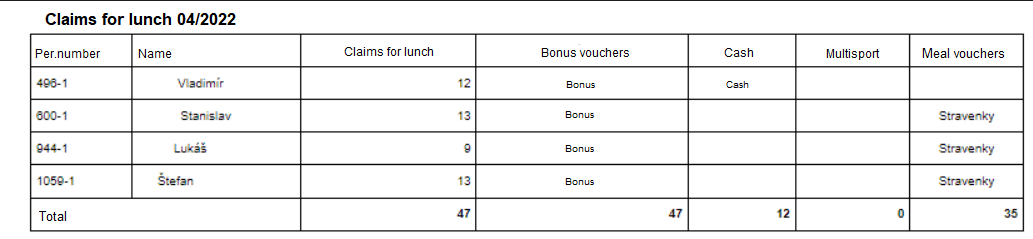
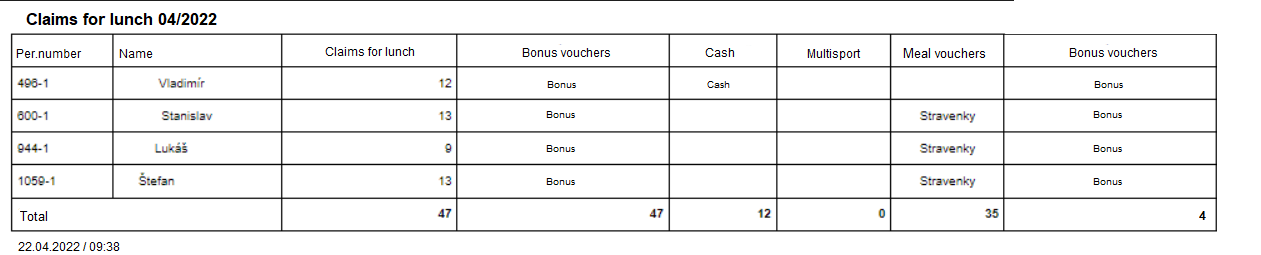
Employee attributes - Claims for lunch - in the print report, a note is created for the employee according to the employee's assigned attributes (e.g. bonus voucher, mutlisport bonus, etc.)
Example

The print report will look like this:
Employee attributes
If we also select employee attributes:
Example:

Another column will be added in the print report:
Note
Employee attributes are a paid module. If it is not activated, the print report cannot be set.
# Managerial overview
The possibility of creating your own detailed reports according to the set criteria:
1. Attendance map - cumulatives
2. Specific cumulatives
The management report settings in this section are the most used settings. In the managerial overviews themselves, these settings can be changed as needed.
Basic settings for quick option valid for all overviews:

Quick period selection - Months - choose a period in the number of months that suits you for reports as a quick option
Quick period selection - Years - choose a period in the number of years that suits you for reports as a quick option
# Attendance map - cumulatives
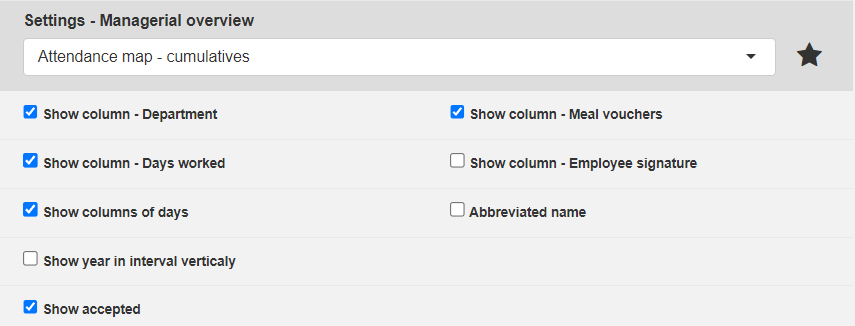
Click on the options that you want to be displayed in the attendance map overview:
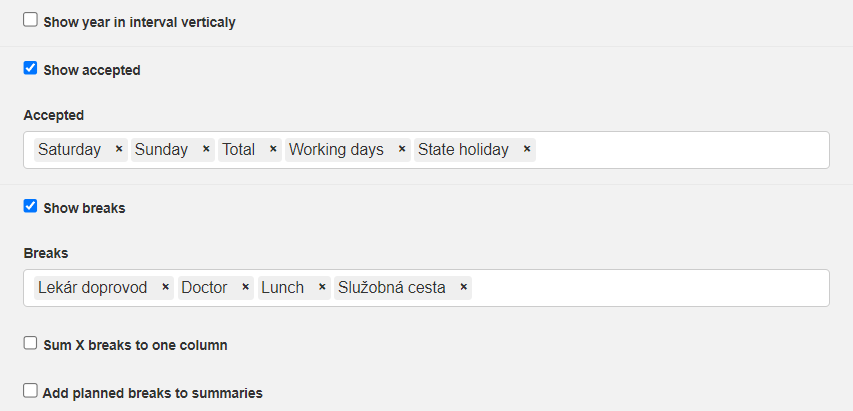
Click on the options that you want to be displayed in the attendance map overview. At the same time, select the options for "recognized hours" and the options for which breaks you want to display in the report:
# Specific cumulatives
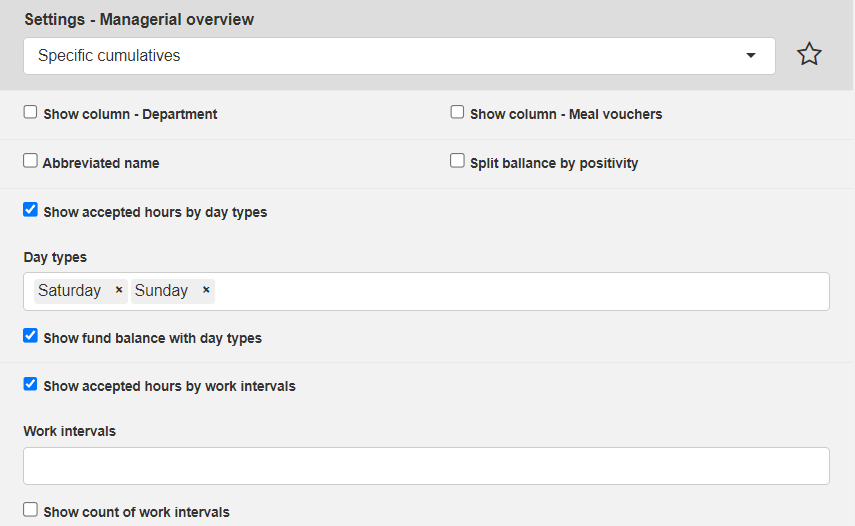
Click and enter the options you want to be displayed in the Specific Cumulatives overviews. At the same time, select options for Day types, Working intervals and Tariff intervals:

# Work intervals
Work interval - defines the beginning and end of one work shift and determines the fund of working time for one day.
When installing the attendance system, an 8-hour work interval is preset.
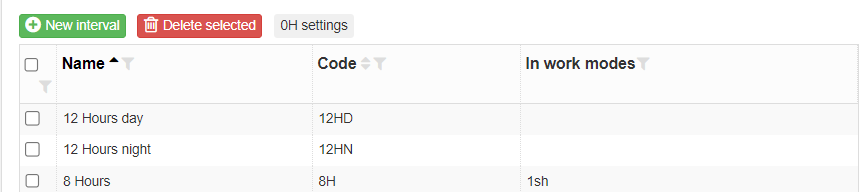
To enter a new working interval, press the New interval button and fill in:
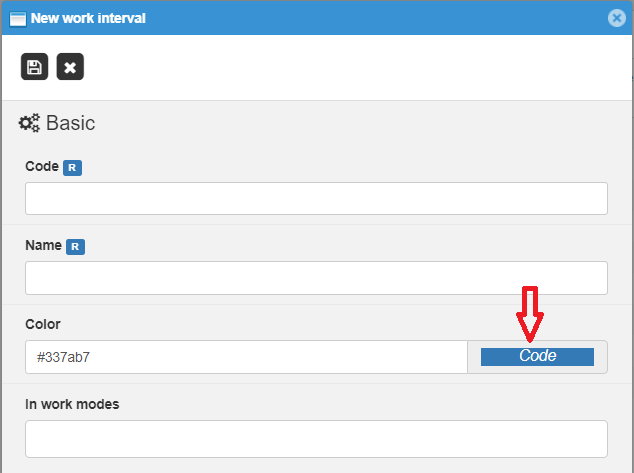
Code - e.g. 8H
Name - e.g. 8 hours
Color - click to select from the color scale
Note
R - value must be entered. You do not need to fill in the item "In work modes". As soon as the interval is assigned to the work mode, the item will be filled in by itself.
Add  .
.
To further set the work interval, click on the line:
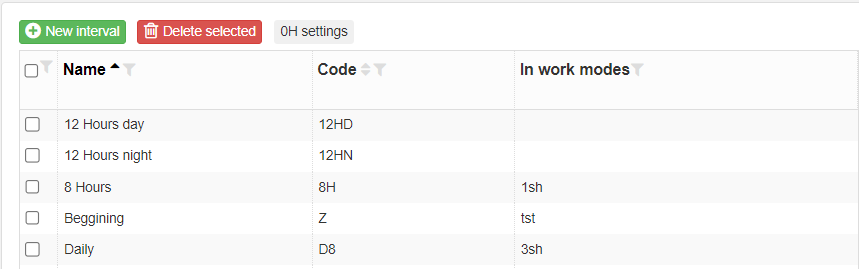
After clicking, the table for setting the work interval rules will appear:
# Rules
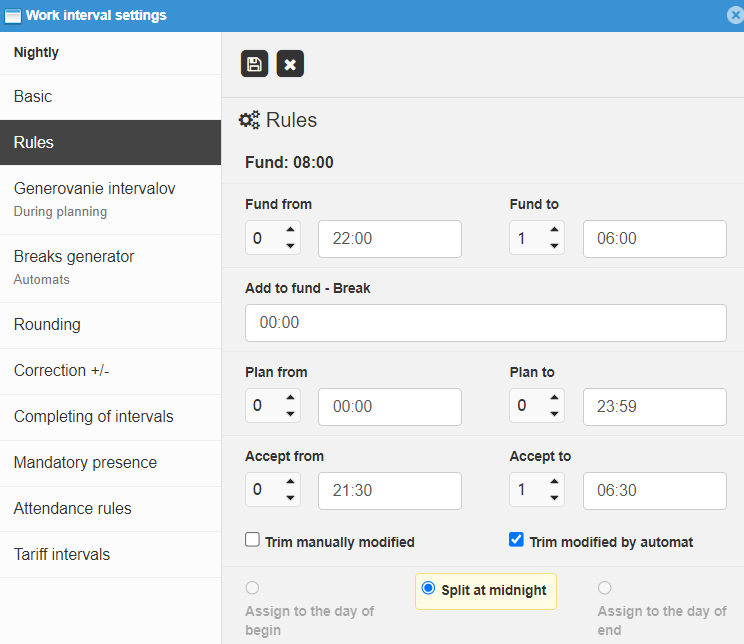
Set the work interval pool, e.g. 8 hours from 8:00 a.m. to 4:00 p.m. The from-to fund firmly defines the duration of the work interval (services). If a break (e.g. lunch) is to be added to the fund, enter the duration of the break in minutes:

 + day- means shifting the change by one day. If I have 1 in the end box, it means that I will start the shift at 8:00 a.m. on Monday and I finish at 4:00 p.m. on Tuesday. It is mainly used when entering night shifts, i.e. overnight work.
Example

Additional rule settings:

Plan from - to - determines the time in which the scanned transactions are to be included, from which the working time is calculated. It defines working hours. It is set mainly for automatic assignment of work shifts.
Accept from - to defines the time from when until the working time is accepted. For example, work is planned. time from 6:00 a.m. until 2:00 p.m. but it can be accepted as early as 5:50 a.m. until 2:10 p.m. The parameter Accept from-to gives room for creating overtime. A day can also pass through several days. So if an employee arrives at 5:45 - his working hours will be accepted only from 5:50.
Trim manually modified - trims the manually entered time for attendance according to the set time trimming rules.
Trim modified by automat - trims the time generated by the attendance automat according to the set time trimming rules
Assign to the day of begin, Split at midnight and Assign to the day of end are mainly used in the evaluation of the night shift. Standard 8-hour service from 8:00 a.m. until 4:00 p.m. is assigned to the start day.
# Interval generator - during planning
It is used to automatically generate the entire working interval (without registration on the reader or WR), or an break to an interval, or an all-day break.
Example
It is used for Negative Attendance, where work is pre-generated for the whole year ahead and breaks are entered e.g. through the reader. Or an breaks (e.g. lunch) is generated right into the work interval.
Options for generating intervals during work mode planning:
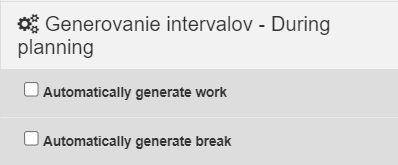
Automatically generate work - generates and schedules the work interval ahead for the selected period.
Example
Employees have work intervals generated in advance for the whole year in attendance from 8:00 a.m. to 4:30 p.m. They only enter breaks and absences in attendance.
Automatically generate break
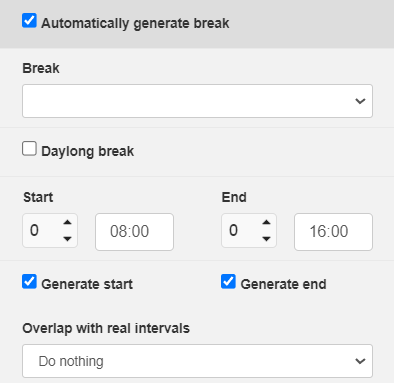
Break - click to select a break that will be generated in the set working interval.
Daylong break - if the break is daylong, choose this option
Start - End - If the break is not daylong, enter the beginning and end of the break, which will be generated during the working interval.
# Automats
It serves to automatically generate an break to the work interval at a precise time according to a precisely specified condition.
The condition for generation is entered using the pom button + :

Set the generation conditions:
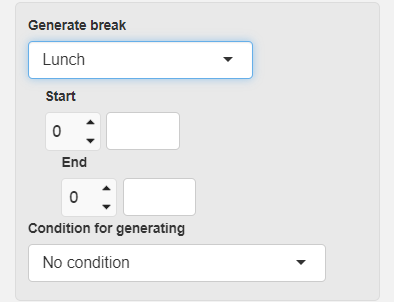
choose what break should be generated
enter the start and end of the break
enter the condition for generating the break
1. No condition
2. Minimal accepted time in work - if you choose this option, enter the minimum time the employee must spend at work in order for the break to be generated.
3. Have claim for 1 break
4. Have claim for 2 breaks
Example
Lunch should be generated exactly from 11:00-11:30. The condition is that the machine must be turned on - generation according to the work interval (group settings - automats - Use the work interval generator if it is set)
# Rounding
Rounding adjusts the start and end of the shift according to the set criteria.
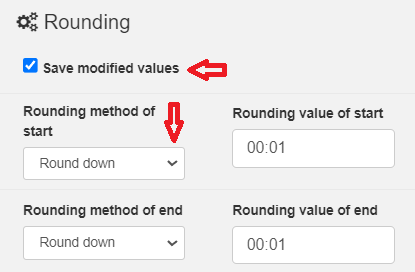
Save modified values - the rounded time data is also displayed in attendance. If the option is not clicked, rounding will only take place in the background and will only be reflected in the balance.
Rounding methods - select the method by which the time data is to be rounded for the start and end of work separately.

Rounding values - enter the time in minutes for the start and end of the work
Example
We round the beginning up by 15 minutes and the end down by 15 minutes, the rules define working hours: 8:00 a.m. to 4:00 p.m., the employee arrives at work at 8:01 a.m. and leaves at 3:59 p.m., accepted will be from 8:15 a.m. to 3:00 p.m.: 45 (we will therefore have a negative balance of 30 min.).
# Correction +/-
Correction adjusts (trims) the start and end of the shift according to the set criteria.
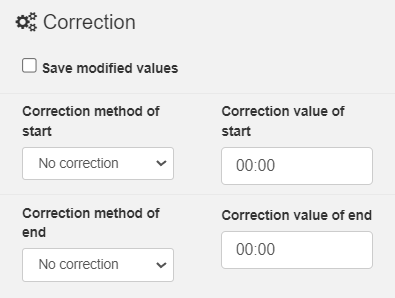
Save modified values - the trimmed time data is also displayed in attendance. If the option is not clicked, then trimming will only take place in the background and will only be reflected in the balance.
Correction methods - select the method by which the time data is to be corrected separately for the start and end of the work.

Correction values - enter the time in minutes for the start and end of the job
Example
Time correction is used e.g. at work where it is necessary for the employee to change clothes. The employer can add the exact time to the arrival time and also subtract the exact time from the departure time, e.g. 5 minutes.
# Completing of intervals
The setting defines the way of completing incomplete intervals. In the event that an employee forgets to complete a transaction upon arrival or departure, it can be completed automatically, seeautomats. However, if you require a different time than the one defined in the rules, you can enter it right here.
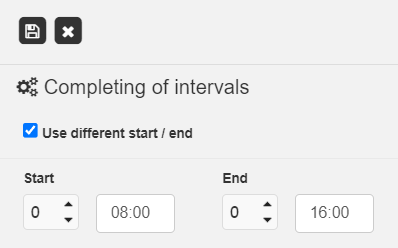
Use different start / end - if the option is not clicked, the incomplete interval will be completed according to the setting of the start and end of the work interval. If the option is clicked, the interval will be completed according to the specified start and end times.
# Mandatory presence
Setting the time interval for flexible working hours, when the employee must be at work. The employer may or may not control mandatory presence
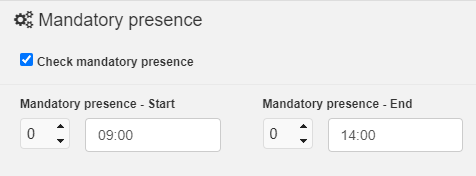
Check mandatory presence - when clicking, choose the beginning and end of mandatory presence.
Example
Employees have a prescribed 8-hour working time, which is variable. From 8:00 a.m. to 2:00 p.m. they must be present at work. If he violates this defined mandatory attendance, the day of attendance will light up in yellow with a Watch icon:

In the employee overview, the line with the employee will also be highlighted in yellow with a Watch icon:

# Tariff intervals
The setting serves for the precise definition of the duration of the defined work interval. It divides the employee's working interval into tariffs. A list of working modes is created in common settings. The exact rules are defined in see. link

Click to define:
Method of split to tariff intervals
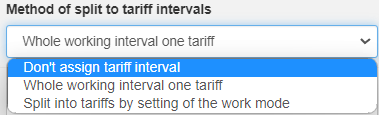
Tariff for work interval - choose a specific work interval
Example
The division of working intervals into tariffs is used in the attendance mode, where the working time plan is not generated in advance and the monthly fund is not defined. The system automatically assigns a work shift based on the time at which the employee completed the arrival or departure transaction. The employee comes to work at 1:50 p.m. and leaves at 10:10 p.m. According to the time of arrival and departure, the system assigns him the corresponding work shift.
For the correct setting, the number of tariff intervals must be entered, see link
# Breaks
An interval defined at the start and end, which is part of the working time, such as lunch, doctor, etc. Break can have different effects on the working time:
- it is added to the working time (holiday)
- it is deducted from the working time (private)
- it is only recorded without impact on working time
Each break, the rules of which we set, must first be entered in the code list of breaks in the System, see. link

By clicking on a break, a table will appear for the exact setting of the break:
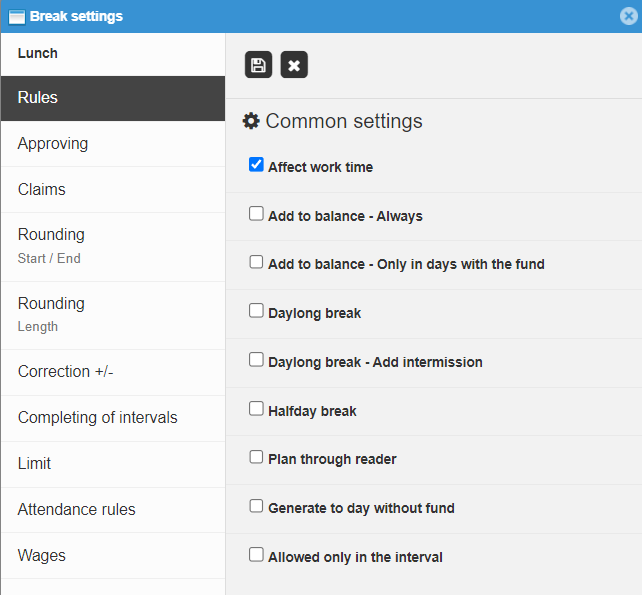
# Rules
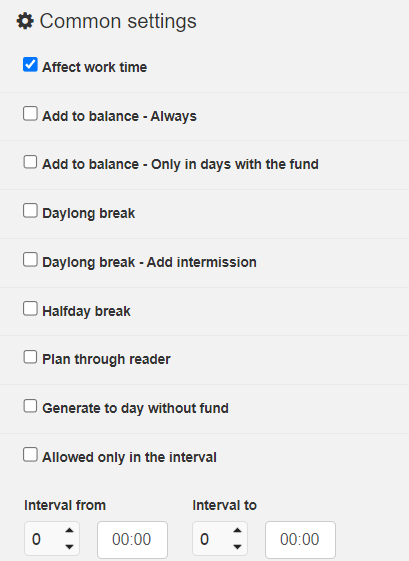
By clicking in the table, select individual rules for break:
Affect work time - the break is included in the working time (added or subtracted)
Add to balance - Always - breakis included in the balance of the day with fund / without fund (zero working interval)
Add to balance - Only in days with the fund - the break is counted only on the day with the assigned work balance
Daylong break - click if the break is daylong
Halfday break - click if the break is halfday
Plan through reader - the break can be scheduled on the reader. This option must not be selected if the break is classified as an approved break.
Example
Vacation planning through reader: The employee plans the vacation on the reader by choosing to go on vacation instead of leaving work on the last day of work. The system automatically closes the day and at the same time generates a vacation until the employee does the transaction of coming to work on the reader.
Generate to day without fund - the break is inserted into free days without fund (zero working hours)
Allowed only in the interval - if break is allowed only in some specific time interval, fill in the time interval.

# Approving
Setting how the break should behave within the approval process.
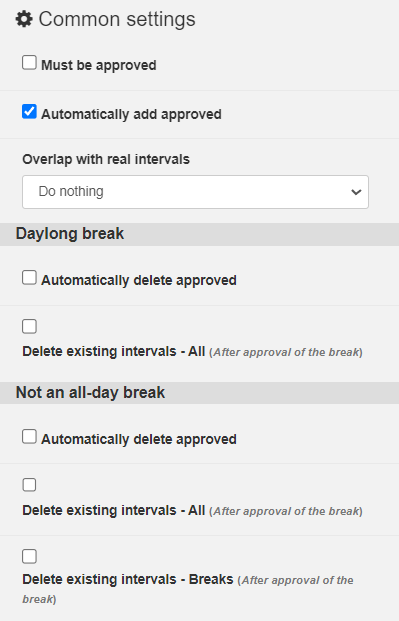
Must be approved - the break must go through the approval process.
Note
If the break is marked as approved for attendance, it will only be entered through the approval process or the intervention of an auto-approver. Break scheduling on the reader is not possible.
Automatically add approved
- if the option is clicked, the approved break is immediately transferred to attendance:

- if the option is not selected, the break is added only as an interval waiting for manual intervention (addition):

Daylong break

Automatically delete approved - applies to changes that are approved in advance (e.g. vacation). The break is recorded in attendance and pending. If the employee comes to work on the day when he has an approved break and shows his arrival at work, the system automatically deletes the break from attendance.
Delete existing intervals - All - if the break is approved, it will be entered in the attendance record, and the system will automatically delete all existing intervals on the given day.
Not an all-day break - setting for a break that is approved but not a daylong (e.g. doctor)

Automatically delete approved - applies to a transfer that is approved in advance (e.g. by a doctor). The break is recorded in attendance and pending. If the employee comes to work on the day when he has an approved break and shows his arrival at work, the system automatically deletes the break from attendance.
Delete existing intervals - All - after the break is approved, the system automatically deletes all intervals on the given day from attendance.
Delete existing intervals - Breaks - after approving the break, the attendance system will automatically delete all breaks on the given day.
# Claims
It defines whether and under what conditions claims for lunch and breaks arise during breaks.
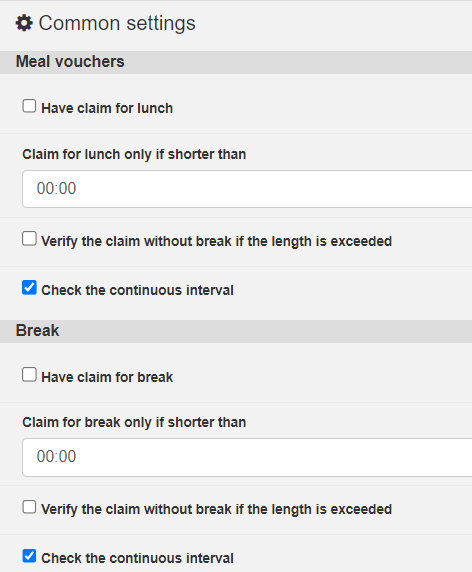
Meal vouchers
Have claim for lunch - if you click this option during the break, you are not entitled to a claim for lunch
Claim for lunch only if shorter than - defines when the employee is still entitled to a claim for lunch within the break.
Example
Business trip within 5 hours. The employee is entitled to a claim for lunch. Over 5 hours he gets diets.
- Verify the claim without break if the length is exceeded -If the parameter "Claim for lunch only if shorter than" is enabled and the set length exceeded, then attendance determines the claim additionally without the given break.
Example
The employee was 5 hrs. on a business trip and then it was still 6 o'clock. at work. If the parameter is not allowed, the employee is not entitled to a meal voucher. If the parameter is enabled, it qualifies for a meal voucher because it was still 6 hrs. at work.
- Check the continuous interval - If the parameter "Claim for lunch only if shorter than" is enabled, then the rules setting must fulfill one continuous interval.
Example
If the employee will be on a business trip twice a day for 3 hours and then for 2 hours, and continuous interval checking is enabled, he will be entitled to claim for lunch. If continuous interval checking is not enabled, he will not be entitled to claim for lunch because those 5 hours are not continuous.
Break
Have claim for break - the parameter determines whether the claim for a break arises/does not arise within the break.
Claim for break only if shorter than - defines when the employee is still entitled to a break within the break.
Verify the claim without break if the length is exceeded - If the parameter "Claim for break only if shorter than" is enabled and the set length is exceeded, then attendance determines the claim additionally without the given break.
Check the continuous interval -If the parameter "Claim for break only if shorter than" is enabled, then the rules setting must fulfill one continuous interval.
# Rounding (Start / End)
Rounding adjusts the start and end of the break according to the set criteria.
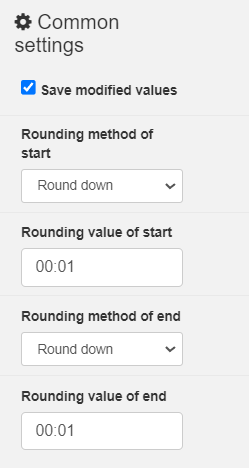
Save modified values - - the rounded time data is also displayed in attendance. If the option is not clicked, rounding will only take place in the background.
Rounding methods - select the method by which the time data is to be rounded for the start and end of the break separately.

Rounding values - define the rounding values for the break start and end.
Example
We round the beginning of lunch down by 5 minutes and the end up by 5 minutes, the employee leaves for lunch at 11:59 and returns at 12:31. Departure at 11:55 and arrival at 12:35 will be counted.
# Rounding (Length)
Rounding adjusts the length of the break according to the set criteria.
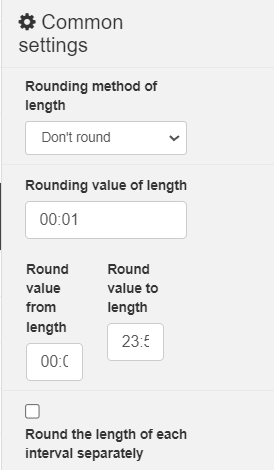
Rounding method of length - select the method by which the length of the break is to be rounded.
Rounding value of length - enter a length rounding value
Round value from - to length - a parameter that allows the break to be rounded only for the specified interval of the break length.
Example
The employee is entitled to a 30-minute lunch. The employer tolerates a lunch of up to 45 minutes. That is, if the employee is at lunch for 31 min.-45 min. lunch is rounded up in the system to 30 min. If the employee exceeds the allowed tolerance of 45 min., the lunch is not rounded and the real length of the lunch is displayed in the system.
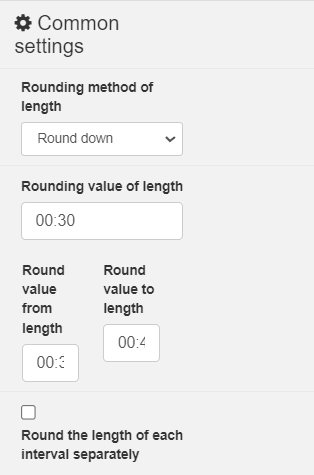
Round the length of each interval separately - if the given break occurs more than once in a day, each one is rounded up separately. If the parameter is not activated, it only rounds the total length of the given break in a day.
Example
The employee goes to the doctor. The time spent at the doctor will be 2 hours and 25 minutes. The employer counts the time spent at the doctor's office after 15 min. The system rounds the time spent at the doctor's office to 2 hours. 30 min.
# Correction +/-
Correction firmly adjusts the start and end of the break.
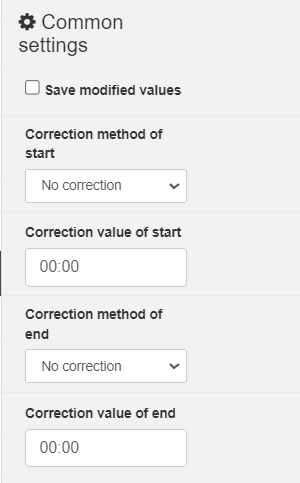
Save modified values - the adjusted time data will also be displayed in attendance. If the option is not clicked, rounding will only take place in the background.
Correction methods - select the method by which the time data is to be adjusted for the start and end of the break separately.

# Completing of intervals
A parameter that is used to define the way in which individual types of breaks are to be automatically completed if the employee forgets to scan the transaction when arriving from a break or when leaving for a break. With this functionality, at least one transaction must always be scanned, either arrival from a break or departure to a break. It is possible to enter several ways of supplementing breaks, depending on which break requires it.
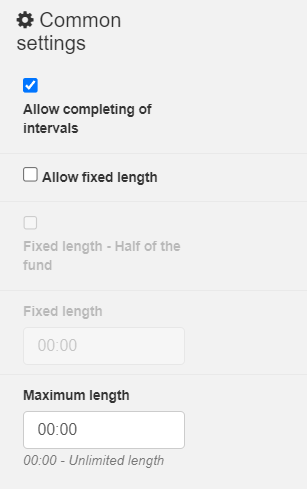
Allow completing of intervals - a parameter that allows filling in intervals.
Allow fixed length - the break has a defined fixed length (e.g. a daylong holiday).
Fixed length - Half of the fund - the break has a fixed exact length, which is half of the defined daily fund.
Fixed length - specifies a fixed break length. The parameter Allow fixed length must be enabled.
Maximum length - determines the maximum length of the break, which should be supplemented by the machine. The unlimited length is entered as 00:00.
Example
Lunch
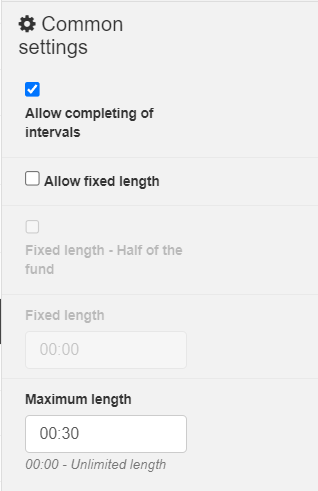
Completion of an incomplete transaction is allowed, and at the same time, the duration of the break is limited by law to 30 minutes. If an employee forgets to "departure for lunch", but when returning from lunch makes a correct transaction "arrival from lunch", the missing transaction is automatically completed so that the total duration of the break corresponds to the set maximum length (30 minutes).
Example
Doctor
It will be supplemented until the end (or beginning) of working hours.
Example
Halfday holiday
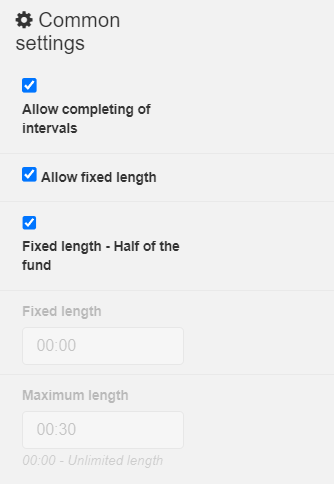
Defined for half of the 8-hour daily fund.
# Limit
The parameter is set if the break is one of the limited breaks (vacation, doctor, accompanying a family member). It is possible to define two more optional limits (e.g. sick day).
Defining limits :
Limit type - choose what type of limit it is
            - Holiday
             - Doctor
             - Doctor family member
             - Accompanying a disabled
             - Limit 1
             - Limit 2
Number if length same as fund - if the break has the length of a daylong working time fund, the specified value will be deducted from the limit (if the value is 1, then, for example, 1 day or 1 hour will be deducted)
Number if length shorter than fund - if the break is shorter than the daily fund, the specified value will be deducted from the limit (e.g. the value of 0.5 - half a day for a halfday holiday)
Example
Limit- Doctor
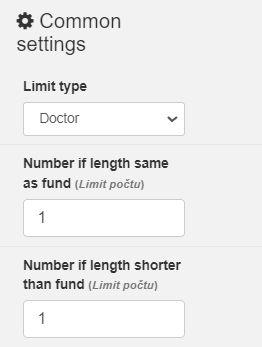
Number if length same as fund - if the employee is with the doctor all day, the entire working time fund for the given day in hours is deducted from the limit.
Number if length shorter than fund - if the employee is at the doctor's, e.g. 2 hours (that is, shorter than the daily fund) will be deducted from the limit of 2 hours.
The setting also applies to the limits - Doctor family member and Accompanying of disabled
Example
Limit- Holiday
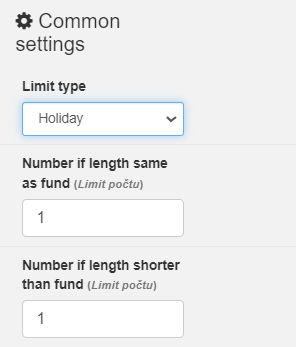
Number if length same as fund - if the employee is on vacation for the whole day, the entire working time fund for the given day in days is deducted from the limit - i.e. one full day.
Number if length shorter than fund - if the employee is on vacation, e.g. 6 hours (that is, shorter than the daily fund) one whole day will be deducted from the limit.
Example
Limit- Halfday holiday
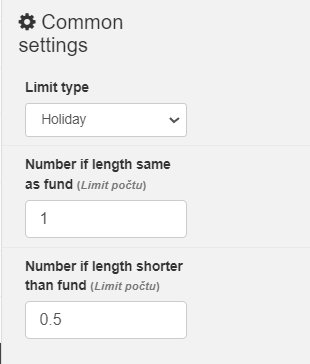
Number if length same as fund - if the employee is on vacation for a whole day, the entire working time fund for the given day in days is deducted from the limit - i.e. one whole day.
Number if length shorter than fund - if the employee is on vacation, e.g. 6 hours (that is, shorter than the daily fund) will be deducted from the half-day limit.
Note
For a more detailed definition of the limits, see. link
# Attendance rules
The parameter defines whether or not the break is considered a rest when checking continuous daily rest.

# Wages
The parameter defines how the break is exported to wage SW.

Number - exportuje sa nastavená jednotka prerušenia (napr. lekár v hodináchú minútach, dovolenka v dňoch atď.)
Export average value - the average break value is exported
# Breaks limits
Break code list for optional limits (Limit 1 and Limit 2).

Name - enter the name of the optional limit
Shortname - enter the shortname of the optional limit
Note
Setting optional limits for breaks, see. link part Limit .
# Wages Export
Setting up a specific export for wages.

Select the wages program to which you will export the attendance data.
You can set how summaries will be exported:
      - Export monthly summaries
      - Export daily summaries
      - Export according to wage code settings
Note
Possibilities of exports to wages programs:
Anasoft, Cora Geo, HELIOS /Green, Orange/ (Asseco),Humanet (HOUR), Info Office MMI, Magma HCM (AUTOCONT), KEO, MRP, NGA Human Resorces, Noris, OLYMP (Kros), PERM 3 (Kvasar), Proces, SAP version 1, SAP version 2, SAP 2016, SOFTIP Profit, SPIN (Asseco), SRS Emel, TP Soft, Trimel, URBIS (MADE), Vema, VDG, WÉČKO (Asseco), WinPam (IVeS), Money S3, Elanor, Universal (APIS) export
# Wage codes
Dial for entering wage codes for export to wage SW.
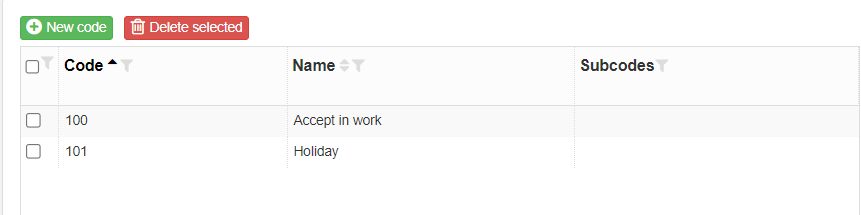
Use the New code button to enter a new salary code:
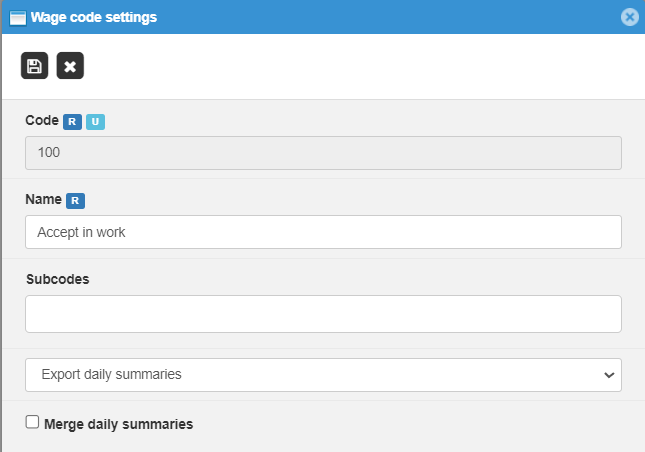
Note
R- value is required
U- value must be unique
# Tariff intervals
The setting is used to precisely define the duration of individual work modes (or work shifts). It divides the working time of the employee into tariffs. Dial of working modes. The exact rules are defined in see. link
Use the New interval button to define the interval to which tariffs will be assigned in the group settings.

Note
R- value is required
# Attributes
Attributes serve for more subtle characteristics of the day or the employee:
      - Day attributes
      - Employee attributes
# Day attributes

Use the New record button to create a new day attribute:

Enter the code and name of the day attribute and save with the Add button.
Note
R- value is required
# Employee attributes
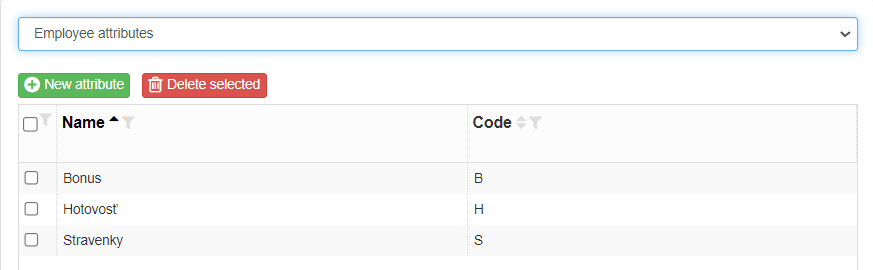
Use the New record button to create a new day attribute:

Enter the code and name of the day attribute and save with the Add button.
Note
R- value is required
# Readers
Assigning the day attribute to the attendance reader.
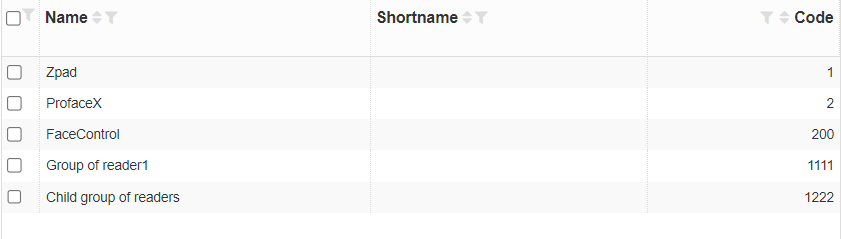
By clicking on the reader, assign the reader a day attribute:

Note
Parameters for attributes of the day for readers can only be defined if the Day attributes module is purchased and activated.
# Employees
Assigning an employee attribute to a specific employee.
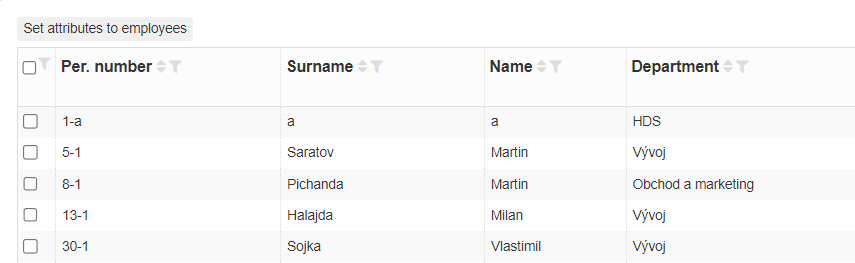
Click to select the employees to whom you need to assign the same attribute and press the Set attributes to employees button :

Save
Note
Parameters for attributes of the day for readers can only be defined if the Day attributes module is purchased and activated.
# Activity log
Parametre pre nastavenia prehľadov histórie činností užívateľov. Ide o zmeny nastavení, zmeny oprávnení, zmeny prístupov na strediská, zmeny stavov transsakcií.

How many months to archive - the number of months the log should be kept. If 0 months is defined, old records are not deleted.
Click to choose which changes you want to track:

Save
# Modules management
Overview of attendance modules.
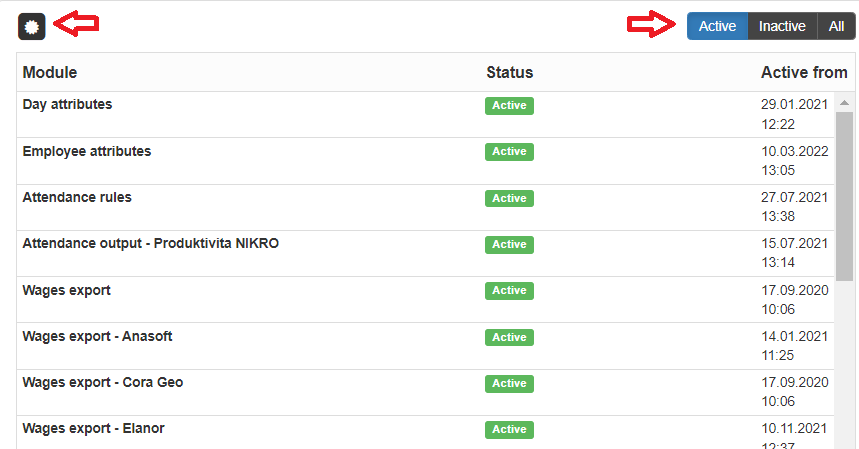
Button  serves to activate the license of the purchased module.
The Active button displays the active modules.
The Inactive button displays inactive modules that can be purchased.
The All button displays all modules.